How much do I love stuff that’s free? Not too much.
How much do I love good stuff that’s free? A whole lot.
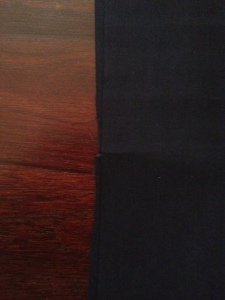
For future reference, here are the “pattern” and instructions to make a fully lined robe! Actually it’s reversible, which is why I’ve used really nice soft navy for the outside and the same material, but in off-white, for the inside (lining). If anyone actually reads this AND ends up using this to make a robe, please share it with me. It will cheer me up to no end. Thank you in advance.
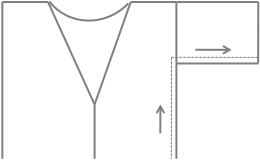
Pattern:
You have to make your own pattern according to your measurements. This size should fit a XS – S and maybe a M. Here are my sizes.
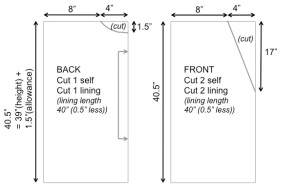
Main piece: My shoulders are 16″, add 8″ (4″ on each side) to determine the width of your back piece, which includes a 1/2″ seam allowance. I wanted the robe to hit just below the knee which (shoulder to knee) was 39″.
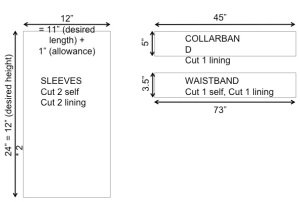
Sleeve: It depends on how wide and long you want your sleeves to be. I wanted mine to be 12″ wide and 11″ in length.
Instructions:
0. Cut self and lining according to your measurements, using pattern above. Remember to cut lining 1/2″ shorter than the self. All seam allowances are 1/2″ unless stated otherwise.
1. With right sides together, pin and sew the left front and right front with the back, along the shoulder seams. Press seams open.
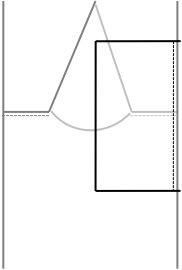
2. With right sides together, pin and sew sleeve with the bodice. Make sure that the centre of the sleeve (when folded half lengthwise) matches the shoulder seam from step 1. Press seams towards sleeve. Repeat with the other sleeve. (PS: Sorry about the terrible photos)
3. With right sides together, pin and sew along the side seams and sleeves, starting from the hem. Press seams open. Repeat steps 1 – 2 – 3 for lining.

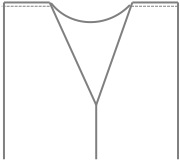
4. Right sides together, pin and sew right-front self with right-front lining starting from the end of the collar mark down it’s length till the hem. Remember, the lining will be 1/2″ shorter than the self. Press seams together towards lining. Repeat for left-front self with left – front lining.

5. Insert the rest of the lining in to the self / shell (the main outer fabric piece), wrong sides together as if you were dressing the lining with the self. Set aside.
6. Take the collar band and if required attach them together (short side) to form one long band. Press 1/2″ seam allowance on to the wrong side, along the length(s) and then fold and press the entire band in half (lengthwise also). Open all folds, and fold 1/2″ seam on to the wrong side, on the two shorter sides. Pin and sew.

7. Fold the collar band in half by bringing the two short sides together to find the collar centre.
Making sure that the collar centre matches the centre back, pin the collar to the lining and self. Right side of the collar should be pinned to the “right side” of the lining which is now the inside of your bodice.
Sew in the “ditch” – the 1/2″ fold all the way around.
Fold the collar band towards the right side (outside) of your garment using the “middle fold” that you had pressed, then fold the other 1/2″ fold inside between wrong side of collar and right side of self so that all raw edges are hidden. Pin and sew using minimum seam allowance (1/8″ or 1/6″) along the fold. Press.
This process is similar to bias binding. See a great tutorial here.


8. Fold 1/2″ of the lining and self inside (in the middle) of the free end of the sleeve. Pin and topstitch with minimum seam allowance (1/8″ or 1/6″) along the fold. Press. Repeat for the other sleeve.
9. Hem. Fold the self 1/2″ inside and press. Fold 1/2″ again (this time along with the lining) and sew. The robe is almost done!
10. Take the waist band and attach them together to form one long band. Repeat for “lining”. Right sides together, pin and sew along the 2 longer sides. Attach a large safety pin to one of the shorter sides and by pushing the pin in, gently turn the band, right side out. For both of the shorter sides, fold 1/2″ of both fabric in towards the middle to make a sandwich of the ends, and topstitch to finish off the waistband. At this point you can topstitch all around the band, if you like. Press.
11. Optional. If you like you can attach loops on the bodice but I skipped this because I like to have the flexibility to tie my band at varying heights.
That’s it! Enjoy lounging in your fancy new robe!


